

I picked up a copy of “The Transformations of Sakura” recently, a kumihimo book by Claudia Wollny which concentrates on flat braids (Hira Genji) made on a marudai. After scanning through it, I had high hopes of understanding track plans 1 a little better. Before looking more closely at those, I decided to try the cherry blossom (sakura) braid.
First try – practice
I was limited by the number of 100g tama (weights) I had available, so I set up for a variation without side strands – just the blossom strands and weft strands (12 tama, and 680g counterweight). I used 6-strand embroidery floss without splitting it:
- 3 lengths (black) for each of the weft strand tama.
- 12 lengths (maroon) for each of the blossom tama.
I tried working through the movements for cherry blossom, but things didn’t look quite right; the blossoms looked elongated, and their centres weren’t showing. I also kept getting lost. That was all on me. I’d made the side strands too thick. I was trying to remember new sets of moves, rather than flicking to the spot in the book where they were drawn out and following the instructions step by step. Talk about running before I could walk!

I stepped back a bit, and repeated the basic ‘ABC’ movements for a few inches, which as it happens are the moves for a ‘bud’ rather than a ‘blossom’. Because I had set up for cherry blossom, the braid doesn’t look like buds, but it did end up looking more even.

Before I ran out of thread, I tried the cherry blossom again, this time with a bit more success, but they still looked elongated and the centres still weren’t showing.

Second try – success
By this point, I was determined to get it right, so I set up for another cherry blossom braid, this time adding in a single pair of side strands (the maximum I could) to either side of the blossom, and using the same 680g counterweight. The lengths 6-strand embroidery floss were added as:
- 1 single length (blue) per weft tama
- 3 lengths (black) per side strand tama
- 12 lengths (maroon) per blossom tama
This worked! The blossoms looked like they should.

I was lucky. Ideally, I should have been using 18 lengths of maroon per blossom tama. Because the black embroidery floss is slightly thinner than the maroon, it partially compensated for that mistake 🙂
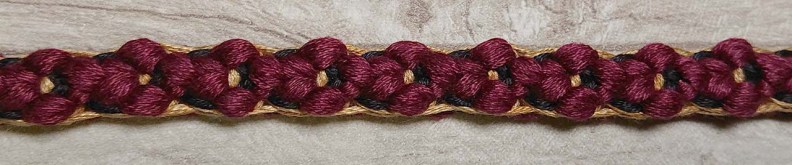
Third try – pansies and experiments
Again using 16x100g tama and a 680g counterweight, I set up the lengths of 6-strand embroidery floss as:
- 1 single length (gold) per weft tama
- 2 lengths (black) per side strand tama
- 12 lengths (maroon) per blossom tama
I don’t think the pansies worked as well. They could definitely benefit from having more than one pair of side strands either side of the blossom, and I felt that I was having difficulty keeping the braid to an even width. Worth trying again, but with more tama and thus more side-strands.

When I shared a photo on facebook, a friend said the flowers would be even better with five petals – they like cinquefoils. Taking a look at the pansy, it looked like a six petal flower in my attempt. So, I tried altering one of the moves for the blossom, crossing the strands as they moved to the opposite side. This sort of worked – making the ‘top’ of each flower look more like a single petal from a distance, but only on one side of the braid.
I’m reasonably sure there’s a better way of creating a cinquefoil braid in kumihimo, and if I figure it out I’ll let you know! 🙂
[1] – Track plans are a way of mapping the courses of threads through a braid. There can be multiple tracks on one track plan. Each track is always a closed loop. A track plan is effectively a cross section through a specific braid.
