

Viscount Richard the Rampant was elevated to the Order of the Pelican at Drachenwald Spring Crown, and I made a couple of gifts for the occasion. One was a length of trim depicting ermine points, to be sewn onto a cap of maintenance. The finished band was around 75cm long, and 23-25 mm wide (31 cards: 20 pattern cards, 11 border cards).
Planning, design & authenticity
The band needed to be narrow enough for hat trim. The threads had to be fine, allowing me to use enough cards to produce a sufficiently detailed design. The main fabric of the hat was to be wool, so I decided this was a good time to try double-face on a 2/16wc wool warp. I used linen for the weft, to make life easier. (I’m not a fan of the ‘grabby’ qualities of wool thread.)

Duncan Kerr reassured me that the ermine points can be depicted in any direction; they don’t have to be perpendicular to the borders of the band. I used the image to the right as inspiration for the initial draft, and as Richard usually depicts a viking persona, I added an Oseberg-style border on one side.
A wool warp and linen weft is in keeping with various tablet weaving finds, where the weft has disintegrated leaving the twined warp behind. The ermine points are not in keeping with a viking persona, but they are appropriate for Pelican regalia.
Testing
I used a backstrap setup rather than my usual warp-weighted system, because I was concerned my weights would be too heavy for the threads.

It took several trials to settle on the finalised pattern. I played around with:
- Turning border cards on alternate rows.
- Repositioning the dots, and flipping cards from s to z position (and back) while working them.
- Elongating the point near the dots. It is this version that I chose to continue using.
During testing, I was having problems keeping the width consistent. I found the wool warp to be much spongier than cotton, linen or high-twist wool, all of which I can control relatively easily. To try and resolve this issue, I decided to check the width far more regularly when I started work on the actual band.
Weaving & finishing
Using a two-pack method, I started by working ~1 cm plain doubleface. Then I worked a motif followed by a 1cm plain section, continuing until the band was long enough, finishing with 4cm plain. I switched turning direction on the border cards after every second repeat. Each motif + adjacent plain section took about an hour to complete.
I checked width every cm while using a weighted beater every other row. I wasn’t as worried about beating the weft in hard, because this time I wanted to take advantage of tablet weaving’s tendency to elongate a pattern. The regular width checks kept the width variation to within 2-3mm, but there were still a lot of width “wobbles” within the 75cm.
The finished band generally looked a lot more uneven than I expected. Wet finishing(1) smoothed out most of the irregularities.


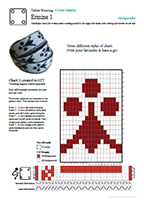
The charts
Three charts are included in the pdf. Just print the one you like, and have a go!
- Simplest: created in GTT, colors denoting background/foreground. I added a separate threading diagram.
- Another version from GTT: each row is represented separately; twist direction is shown on the pattern; you can also show turning direction, but I chose not to.
- A chart which shows foreword and backward turns only, with an outline of the motif superimposed on it.
Resources
Drachenwald: Titles, Precedence, Forms of Address, and Regalia (8. Order of the Pelican)
Guntram’s tablet weaving thingy (GTT)
Handweaver’s Studio: 2/16 wc wool yarns
Mistholme: Pictorial dictionary of heraldry – Hat (cap of maintenance)
Shelagh Lewins: The Narrow Oseberg Band (pdf)
Swicofil: Yarn count converter
Viking Answer Lady: Ermine Spots
1) Wet finishing: I hand-washed the band gently in lukewarm water with a mild detergent. I rinsed it thoroughly, and patted out excess water using a clean linen tea towel. I then sandwiched the band in a fresh linen cloth, and pressed gently with an iron. I took care to *not* pull on the band or otherwise stretch it while using the iron.
